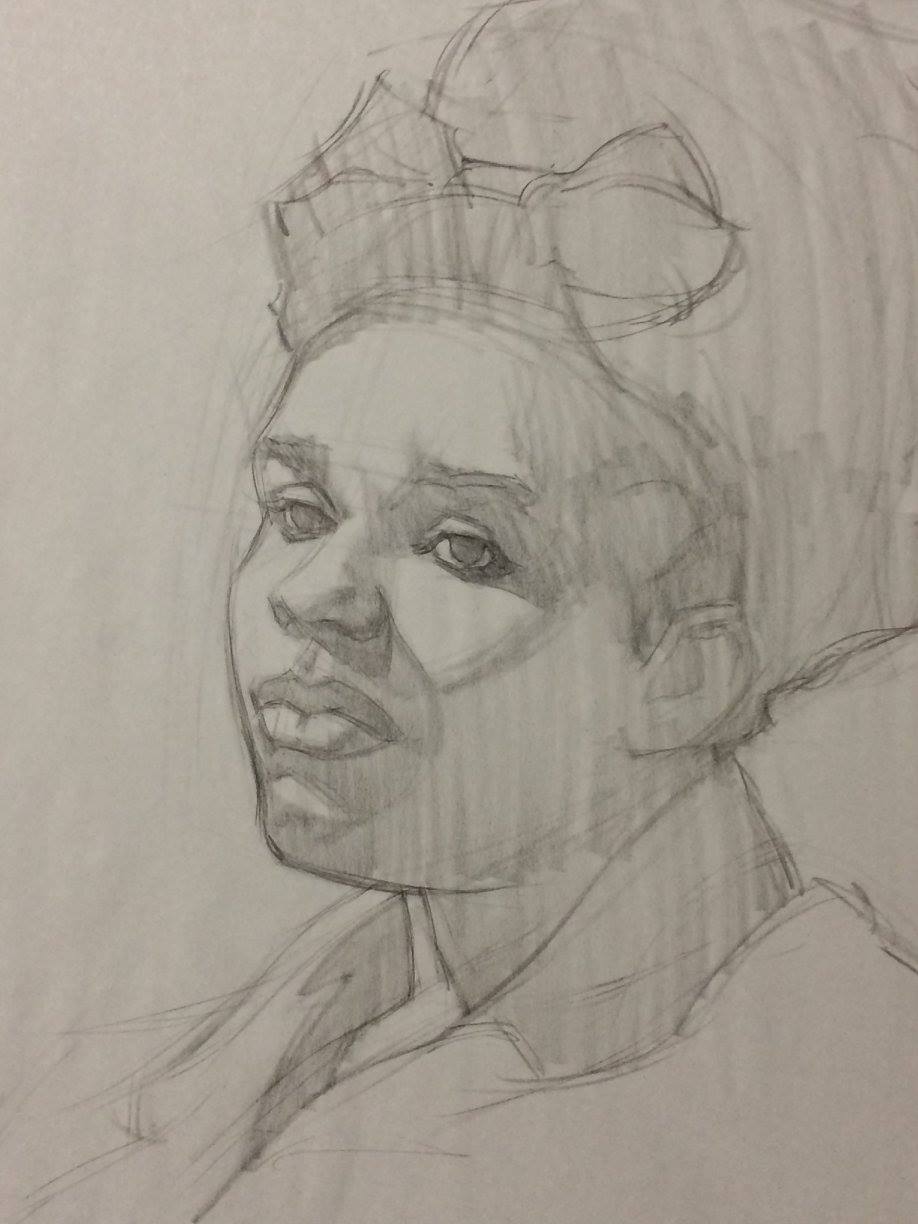
Showing posts with label Portrait Drawing. Show all posts

Thursday, August 21, 2025

Eye Update: Seeing Faces

Sketchbook page, graphite drawing

“How can they meet us face to face till we have faces?” 

- C.S. Lewis, Till We Have Faces

Since my last update, vision in my left eye is slightly improved (I can almost read the 20/30 line on the Snellen chart), but vision in right eye has become worse (double vision effect most likely due to the cataract).

But the most startling development since my cornea transplants is that I can see faces again, especially the subtleties of facial expressions. As my Fuchs Dystrophy progressed, I stopped seeing faces – all I could see were blurry spots where eyes, noses and mouths should be. Subtleties of facial expression were completely lost on me. Then, about a month or so after the first cornea transplant, I was startled by faces at the grocery store, coffee shop, and around town. Seeing a furrowed brow, an eyeroll, a quizzical look, or a smile – something most of us take for granted – was a novelty to me, a pleasant, and much welcome, surprise. I feel as though I’ve been missing out on a vital dimension of life.

In spite of the progress, my vision is still not good enough to resume my old practice of café sketching (I’ve tried but I need to see at least a certain level of detail in order to capture a likeness or personality in a café setting), so I have resorted to sketching from photographs. The above page was sketched from photos taken years ago of neighborhood kids (back when I was an illustration student trying to build a reference library of poses). I haven’t drawn faces in a while, and certainly not in a sketchbook like this. I am struggling to draw hands, and I don’t feel this page has the energy of café sketches executed on location, but I need to start somewhere. This page was sketched with a BLACKWING 602, a pencil I started using while working at DreamWorks long ago. Drawing with pencil on paper again takes me back to my childhood, and remembering why I wanted to be an artist in the first place. 

Thursday, August 7, 2025

Sparring with the Asaro Head

Drawing the "planes of the head" manikin from different angles, charcoal on newsprint

Lately, I’ve been drawing from the Asaro Head – or, as I think of it, “sparring”. Artist John Asaro created various “planes of the head” models, including the classic (or complex) version and the “memorized” (or simple) version. Years ago, I posted my efforts from the classic version. Since recovering from my eye surgeries and getting back to drawing on paper, I decided to start with the simple version (I need to build stamina to tackle the classic version again). I tend to practice drawing like an athlete training for competition. I approach the Asaro head like a boxer stepping into the ring. It’s not enough to draw the Asaro head once or twice; you must draw the head multiple times from multiple angles. It’s a sparring match. You will become fatigued, you will make mistakes, you will need to correct your proportions, and there will be times where you feel like giving up. Drawing a page full of Asaro Heads requires stamina as well as skill. In this particular exercise, you might get one or two good drawings, and then botch the next one, ruining the page. On top of that, you want to compose the page so that all the views of the head look like they were intended to go together in a unified composition. I’m not sure I achieved that here, but the point is to practice. I had to do several of these pages before I felt ready to post one. My life drawing skills have been rusty, and I really needed this practice. The Asaro head makes a great sparring partner.

Below is my studio setup where I am drawing on an old easel build decades ago by my grandfather (a skillful carpenter by trade). The Asaro head is on a camera tripod. 

Photo of easel with drawing board and Asaro manikin on tripod

And just just for old time's sake, here again is one of my efforts from the Classic Asaro head which I posted online years ago. 

A page full of classic Asaro Head drawings, charcoal on newsprint

Wednesday, March 12, 2025

Portrait Drawing Step by Step #3

This drawing was done some years ago at Patris Studio and Gallery. At the time, my vision was getting worse (due to Fuchs Endothelial Dystrophy + cataracts) and I was really struggling to see the details of the model's face accurately. Hence, I focused more on the design of the features rather than accurate likeness.

Photo of model stand and artist's easel

First rough lay-in: During the first sitting, I missed the tilt of the head (or possibly the model moved?), but I knew I would need to rework the drawing anyway during the second sitting, so I keep the drawing light and in line only (I hold off on applying any tone for now).

rough line drawing

Second sitting: This time I get the tilt of the head, and I think the drawing looks better. But I still hold off on applying any tone until I am satisfied that proportions are reasonably correct and the construction of the head is solid.

line drawing gets more refined

Third sitting: I rework the drawing one more time in line, making subtle adjustments to the features, before finally delving into a first pass at tone. By the end of this sitting, I have the shadows mapped out, and the basic value pattern is set, but I hold off on going too dark yet.

Beginning to add tone to line drawing

In the next session, I finally begin to deepen the dark values and establish local value variations (hair, skin, clothing, etc.) The features are further refined and developed.

Developing darker tone

By this stage, I fear the shadow values may be too dark, and I need to develop the mid-tones more. I am also cautious about overusing the white pastel (much too easy to do).

developing value range from light to dark

This is as far as I got by the final sitting. I feel the mid-tone vales could have been developed further, but I was afraid of over-rendering (a bad habit of mine). At this stage, it’s time to admit: there is only so much you can do in one afternoon. It’s best to take what you learn and move on to the next drawing.

refining details

Here is a closeup showing the detail of the face. In earlier years, I would have been more concerned about accurate likeness, but with the vision issues I was experiencing at this time, I let go of the accuracy and focused more on design of the features.  
Closeup showing details of face

Tuesday, March 11, 2025

Portrait Drawing Step by Step #2

Here is another example of portrait drawing step-by-step. This drawing was also done at Patris Studio and Gallery. The first photo shows my setup along with the model, at the end of the drawing session. Below, you can see each step in the drawing process.
Photo of artist's drawing bench and model stand

Each sitting is about about 20 minutes. This first sitting shows my initial lay-in drawing. At this point, I am focusing on proportions and placement of the features. I also try to get some impression of who this person is and hopefully a sense of their spirit or personality. 

Rough line drawing of model's head

During the next sitting, I correct proportions and refine the drawing. I also get started on the value block-in (or blocking in the shadows and defining what areas will be light or dark). 

Refining the line drawing and adding light layer of tone

In the third sitting, I continue to refine the features and also further develop the value pattern. You can see that I am beginning to introduce darker value as I refine the features. 

Adding darker tone while refining the features

In the next sitting, I find that I need to correct my mistakes and redraw some areas. Then I proceed with further developing the shadows tones.  

Adding still darker tone

This was as far as I got at the end of the last sitting. I probably spent too much time correcting mistakes, and the drawing was not fully resolved, but this was much needed practice. I had been away from drawing from live models for a while at this point, and was eager to get back to it. 

Full range of value is added to drawing

Friday, March 7, 2025

Portrait Drawing Step-by-Step

Here is a portrait drawing from a live model that was done at Patris Studio and Gallery. In the first photo below, you can see my drawing setup with the model. Below I show the steps I took to arrive at the final drawing.

Photo of artist's drawing bench with model stand in background

First sitting: Initial Lay-in: The likeness and proportions are slightly off, so I will redraw before adding any tone. The key to accurate portraiture is to spend a lot of time on these initial stages of the drawing. Build a solid construction from the start. Keep checking proportions and angles.

Rough line drawing of model's head

Second sitting - Redrawing: I redraw and correct my proportions and construction. If I am not getting a likeness at this point in the drawing, I may start over. But today, I think I am getting closer to the likeness.

The line drawing is refined

Third sitting - Redrawing/Block in shadows: I am taking all the way to the third sitting before I begin to block in shadows. I am finally satisfied with the proportions and construction. I know from experience that if the proportions or construction are not working now, I will only waste energy later.

Adding a light layer of tone to line drawing

Forth Sitting - Redrawing/Refinement: Now I begin to tighten down the drawing, making smaller adjustments to edges and shadow shapes, and refining the features.

Refining the drawing and adding some darker tone

5th and 6th sittings - Rendering: With solid under-drawing and shadows accurately blocked in, the rendering actually begins to move quickly. If you have done the early stages properly, the values will more or less fall into place, and it becomes a matter of comparing one value to another and adjusting edges (softer or sharper).

Pushing values all the way to dark

Final sitting - Refinement: Now the clock is running out and I must make whatever decisions I can to bring this to some kind of resolution. I look for edges that need to be softened or sharpened, and shapes that need adjustment. I also add highlights with white pastel. I feel I may have over-worked the highlights here, but this is just practice - I must make these mistakes in order to make progress. The point is to learn from the experience and take what you learn forward into the next drawing.

Refining details and adding highlights