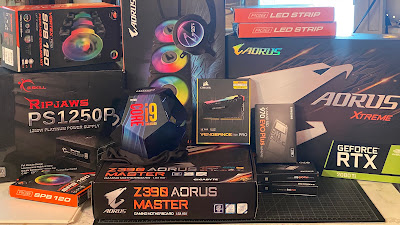
About 5 years ago, I built “The Odysseus Machine”, a desktop PC for my animation/illustration work. I named my computer Odysseus after that great wanderer of Greek Mythology, but also for the unmanned spacecraft Odysseus (later renamed Ulysses) which was launched in 1990 on a highly unusual trajectory to the Sun. I think that describes my path in life: "a highly unusual trajectory".
The Odysseus Machine was probably over-equipped for my needs, but I don’t upgrade often; I tend to buy the best thing I can afford at the time and then use it for as many years as I can get away with. Below is a partial spec list (for a more complete parts list with descriptions, see my build on PCpartpicker).
CPU: i9 9900k - I primarily use Photoshop, which doesn’t really use more than 8 cores, so at the time, this was probably the best CPU you could buy for Photoshop.
GPU: Nvidia RTX 2080ti with 11GB of DDR6 VRAM – Overkill for Photoshop, but great for running multiple 4K monitors and occasional video editing.
RAM: 128GB DDR4 3200 CL16 – This is way more RAM than anyone really needs unless you are making your own Avengers Movie on your desktop, but too much RAM is better than too little.
Storage: 30 TB - includes 2 NVMe SSD drives (2TB each), 2 SATA SSD drives (4TB each), and 1 HDD (18TB). The OS is installed on one of the NVMe drives, while the other is for current projects. The SATA SSDs serve as a library and a place to store finished projects, while the 18TB HHD serves as backup/archives. In years past, I had to delete files to save drive space, but that is not an issue with this build.
Monitors: Wacom Cinitiq Pro 24” touch screen (on which I draw and paint), above it is an LG 27” HDR 4K monitor (I place reference material here), and off to the side is a smaller, older monitor (here I run programs to monitor CPU/GPU temps, hard drives, etc.) Even further to the right is the much older Commodore monitor (from 1985 and it still works!). This one is not attached to my PC. It’s connected to a VCR/DVD player, on which I can play older video reference.
Finally, I must confess that I went crazy overboard with the RGB lighting. I lost all sense of practicality here, but it was lots of fun building and figuring out how to make everything work. I think the final results are quite entertaining.

Next, early stage of the build in-progress: Originally, I had a GSkill 1250w PSU, but it was going bad, so later I replaced it with a Thermaltake 850w (which is plenty of power for my needs).
First "power on" test to make sure everything is working so far. No operating system installed yet. “Cable management” is a total mess at this point, but at least it works!
Installing the GPU (video card). I first tried horizontal orientation, before changing to a vertical mount.
Next photos: GPU is now vertically mounted. The AIO fans have been moved to the front of the radiator, and an additional 2 case fans are now attached to the back of the radiator (partial "Push/Pull" configuration). While removing the radiator, I installed an extra two case fans on the side panel/motherboard tray. This makes a total of 8 case fanes + 3 radiator fans. If you include the 3 fans on the GPU, that is a total of 14 fans running in this build.
“Cable management” is an art form unto itself (and I am no expert), but I routed most of the cables around the back side of the case, and stored as many loose ends as possible under the PSU shroud. In this view, you can see the additional 2 case fans added to the back of the motherboard tray (I was concerned they might interfere with airflow, but it turns out the added fans actually help keep temps down a bit). Also in this view, you can see the Samsung SSDs (4TB each) plus the spinning hard drive (18TB) - plenty of storage. Lastly, I added an RGB hub to control the lighting.


